
I’m having my Bridal Shower on my family’s side at the end of March. So I started brainstorming what I wanted to wear to it. I really loved the Orchid Midi I made for my engagement photos for Minerva Crafts, but I had some fit issues. I felt really restricted in the back armhole/shoulder area. I thought this was the perfect opportunity to improve the pattern for me.

One of my sewing goals for 2019 is to create patterns multiple times to prefect finishings and fit. Chalk and Notch has finishings nailed so for me it was all about fit.
I also had a design changes to make it more my style. So I’ll divide my changes to the pattern between fit changes and style changes.
Fit changes:
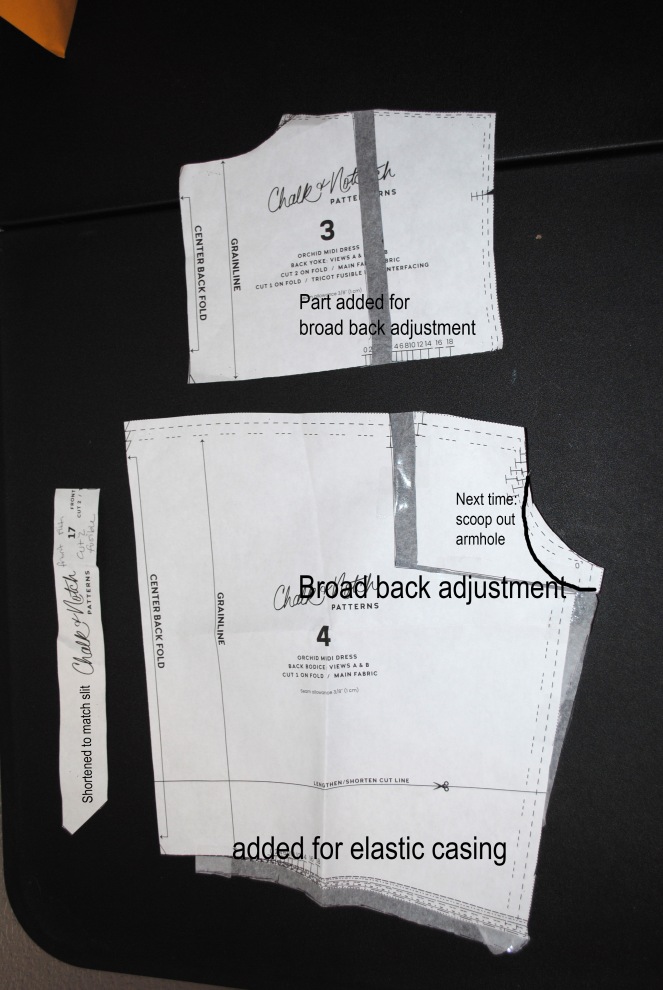
- Broad back adjustment
- I used the Palmer & Pletch fitting book to do the adjustment. This is an uncommon adjustment for me so I followed it best I could. Adjustment did help a lot but I realized it wasn’t the only problem.
- Dug out the armhole
- I actually didn’t do this on the pattern, I was hoping the broad back would be all I needed. The broad back adjustment helped a lot but the armhole was just too small for me. So I winged digging out some of the armhole when it was all finished. I am marking on my pattern photos my plan for next time on the back, I didn’t show you that same on the front, but I would adjust both.
Style Changes:
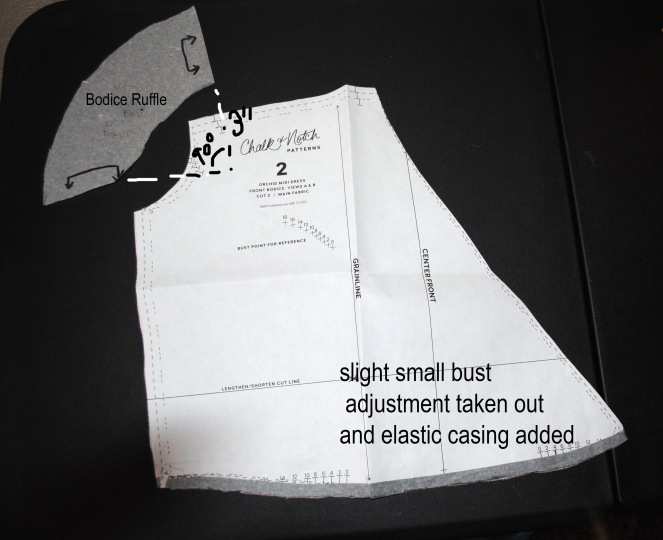
- Bodice Ruffle
- I thought the bodice ruffle would be so cute. I have seen so many wrap dress patterns from the big 4 with bodice ruffles and have been envying this look.
- It was really easy to do. I did the math for a full circle ruffle using the bodice as the diameter. It breaks down to 3″ from the 90 degree angle
- I made it 3″ long, but when you equate hem and attaching to the bodice, it was starting to get too small, so I didn’t line the ruffle up exactly with the raw edge of the bodice. Next time I would add 1/4″ to the width.
- I did a small narrow hem by stitching 1/4″ then using that to fold it twice.
- When attaching it, I did the binding edgestitching not being attached to the ruffle so that the ruffle hides that stitching.
- I kept basted the short edges of the ruffle to the bodice so those raw edges would be taken care of with the bodice.
- Elastic Casing
- The drawstring isn’t really my jam. I love elastic casings.
- I added 3/8″ to the bodice, skirt, and pocket pieces, giving me 3/4″ to create the casing.
- Shortening the midi
- The midi length is great for winter but I wanted a more summer look. So I shortened it 2″ before the slit and 5″ after. That’s a total of 7″. I’m really happy with the length. I didn’t want the slit to come up too high or the slit to not have much length at all. I think I nailed that balance.

The fabric is a cotton poplin from fabric.com. I know someone else had gotten the fabric from Blackbird fabrics, so it shouldn’t be too hard of a fabric to find. I love it. Beautiful dress fabric.

I ordered 3 yards of this fabric and used every bit of it. Keep in mind I used the same fabric for the pockets and left off the pocket triangle piece and I followed Chalk and Notch’s original intent for lining the sleeves, you could save a little fabric by hemming the sleeves instead. I was one circle away from being able to line the bodice ruffles. Those got hemmed.
Pattern: Orchid Midi by Chalk and Notch
Size: 4
Fabric: Cotton Poplin
Alterations: quite a bit, read above
Overall: I still love the design of this dress. It’s june’s Sewmystyle, so I imagine I’ll be sewing it again altering the armhole. This dress is pretty much ideal for me.


2 thoughts on “Orchid Midi Take 2 (bodice ruffle hack)”